ChatGPT Starter Kit for PHP Laravel
This starter kit using PHP Laravel and the OpenAI API.
Like ChatGPT (chat.openai.com/), you can chat with this starter kit in a dialog. It's a workaround I've come up with to provide context to the GPT-3 engine.
Technical Stack
I am using the following technologies for this starter template:
- The latest Laravel v9.x package.
- The latest openai-php/laravel package.
- Inertia JS v1.0
- The latest Tailwindcss v3.x
You initially start with a brand new Laravel application and add the Laravel Breeze starter kit.
While developing this starter kit, I isolated the code and all necessary components under the GPT folder. This applies to the backend code where you find everything under the app\Gpt folder. Or the front-end code where I've added the resources/js/Pages/Gpt.vue page and resources/js/Components/Gpt folder. Finally, for tests, I've added the tests/Feature/Gpt folder to test the functionality of the starter kit.
To run this application, grab your own OpenAI API Key and place it in the .env file:
OPENAI_API_KEY=
Next, install the backend components using the following command:
composer install
Then lastly, run the following two commands to run the application:
npm install && run dev
The starter kit also supports running over a Docker container using the official Laravel Sail package. Therefore, you can run it using docker sail with these commands:
./vendor/bin/sail up -d
./vendor/bin/sail npm
./vendor/bin/sail npm run dev
You can also use yarn instead of npm.
Check the official documentation for Laravel Sail for more information.
Functioning
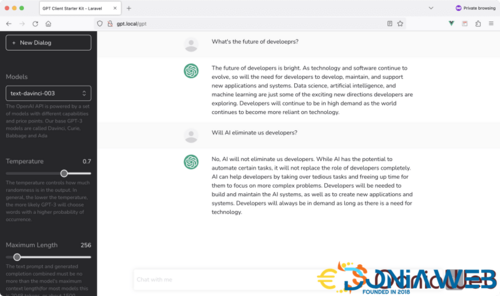
When the GPT Index page loads for the first time, it performs a GET request to the OpenAI API to retrieve all saved models. Those models appear on the left-sidebar of the starter kit to allow the user to select an OpenAI model or engine.
On the GPT Index page, I've set the default model to be text-davinci-003. This is by far the most popular model and you are free to change it.
The user can also play with the Temperature of the completions. The lower the value of the temperature, the more accurate and straightforward the answer will be.
Finally, the user can change the Maximum Length or tokens, generally between 0 and 4000.
When a user enters a new prompt, a new POST request is sent to the server and passes over the following fields:
- Model name
- Temperature value
- Maximum length tokens value
- Prompt text.
The server, by turn, issues a completion request to the OpenAI API to generate a response.
The response text is then displayed to the user as a reply coming from the OpenAI API.
Preserving the Context
Something that I noticed in the OpenAI API, is preserving the context from one prompt to another was absent.
If you try the official chat.openai.com/ website, you notice the context is preserved. For instance, you prompt the chatbot to list five recipes that include Shrimp. In the next prompt, you ask the chatbot to list the ingredients of the second option. Notice that you don't specify the recipe's name in the second option. This is because the ChatGPT chatbot preserves the context and remembers your previous prompt or discussion.
Therefore, this feature is part of the ChatGPT chatbot rather than the OpenAI API.
I found a way to pass context to the model in this starter kit. Hence, using this starter kit, you will have a managed context. The model will remember the original discussion for every new prompt you send. I won't uncover what I did; you can see it when you download your copy of this starter kit





.thumb.jpg.7e31f98f74eff0f78065a1e0a223d0b4.jpg)



You may only provide a review once you have downloaded the file.
There are no reviews to display.