


Product History in POS

By
· 902 views
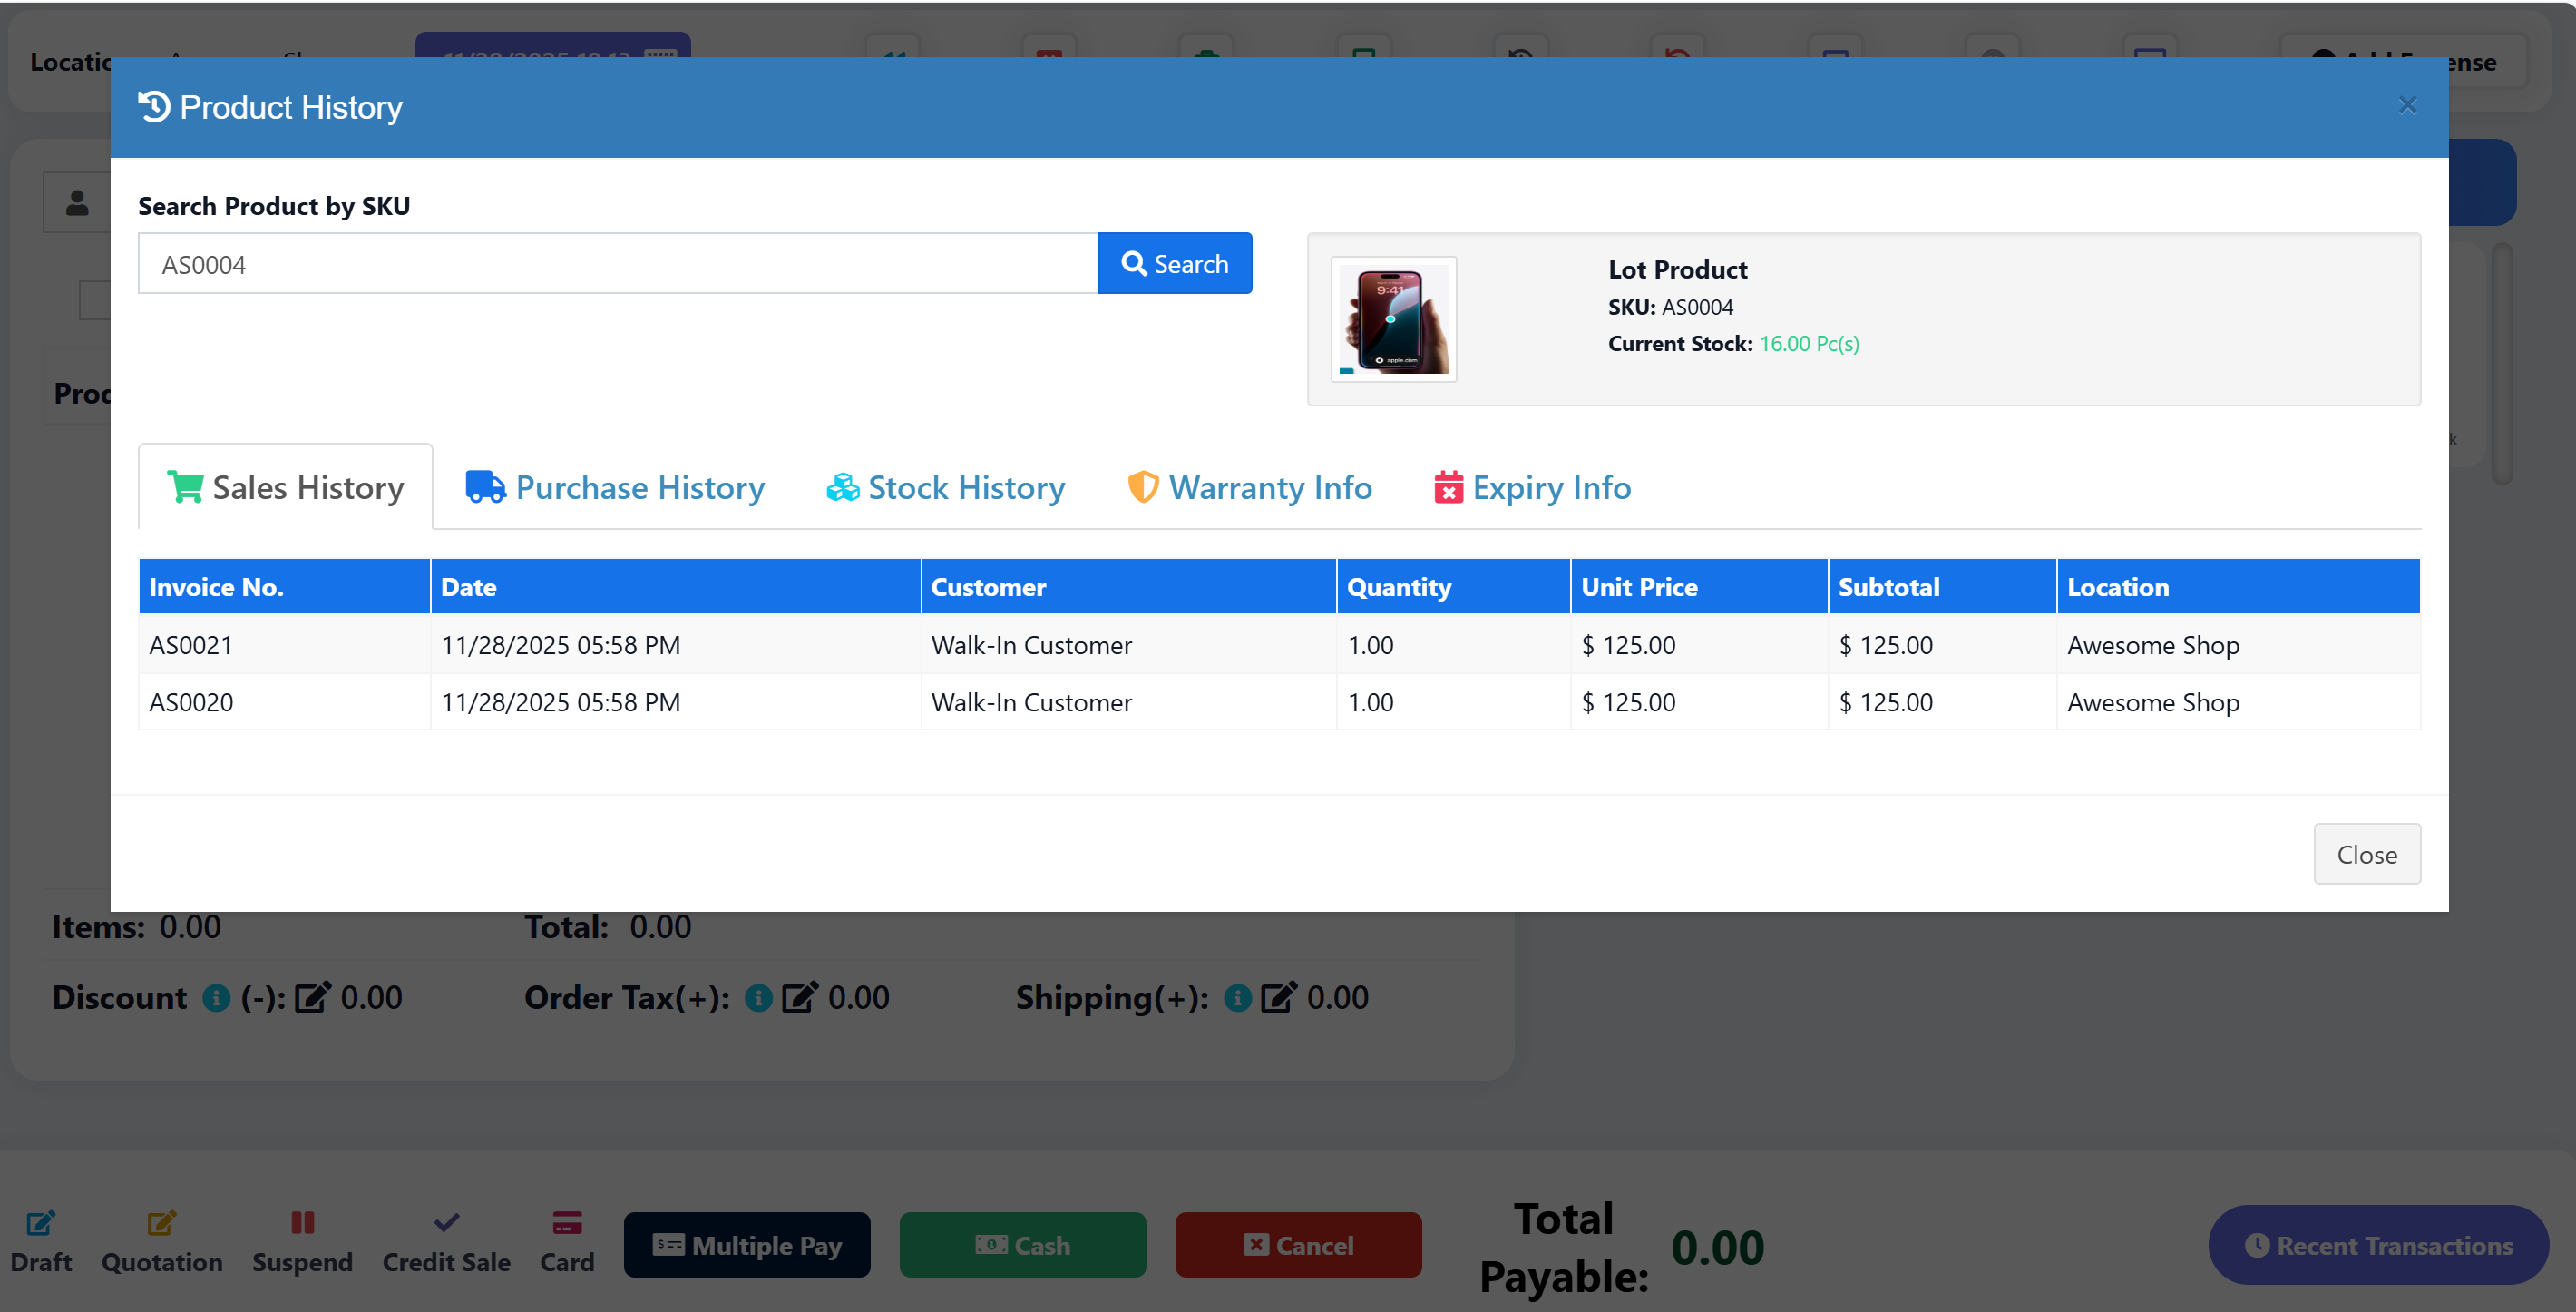
Product History Button in POS Screen
Add a Product History button to the POS header that opens a modal to search products by SKU or name and view their complete history including sales, purchases, stock movements, warranty, and expiry information.
Download
Features
Search by SKU or Product Name (partial match supported)
Search by Variation SKU (sub_sku)
5 History Tabs:
Sales History - Invoice, date, customer, qty, price, subtotal, location
Purchase History - Ref no, date, supplier, qty, price, subtotal, location
Stock History - Date, transaction type, ref, location, qty in/out, balance
Warranty Info - Invoice, date, customer, warranty details, status (Active/Expired)
Expiry Info - Lot number, expiry date, location, stock, days to expiry, status
Pagination - 8 records per page with navigation controls
Bilingual Support - English and Arabic translations
Permission-Based Access - Each tab respects user permissions
Permissions
The feature includes permission-based access control for each data section:
Section | Required Permission |
|---|---|
Base Access |
|
Sales History |
|
Purchase History |
|
Stock History |
|
Warranty Info |
|
Expiry Info |
|
Users will only see data for tabs they have permission to access. If a user doesn't have the required permission, the tab will show empty data.
Files to Modify/Create
File | Action |
|---|---|
| Modify |
| Create |
| Modify |
| Modify |
| Modify |
| Modify |
| Modify |
| Modify |
| Modify |
Installation Steps
Step 1: Add Button to POS Header
Edit resources/views/layouts/partials/header-pos.blade.php
Find the calculator button and add the product history button after it:
<button type="button" id="product_history_btn" title="{{ __('lang_v1.product_history') }}"
    class="tw-shadow-[rgba(17,_17,_26,_0.1)_0px_0px_16px] tw-bg-white hover:tw-bg-white/60 tw-cursor-pointer tw-border-2 tw-flex tw-items-center tw-justify-center tw-rounded-md md:tw-w-8 tw-w-auto tw-h-8 tw-text-gray-600 pull-right"
    data-toggle="modal" data-target="#product_history_modal">
    <strong class="!tw-m-3">
        <i class="fas fa-history fa-lg tw-text-[#9333EA] !tw-text-sm" aria-hidden="true"></i>
        <span class="tw-inline md:tw-hidden">{{ __('lang_v1.product_history') }}</span>
    </strong>
</button>
Step 2: Create Modal View
Create new file resources/views/sale_pos/partials/product_history_modal.blade.php
Copy the content from: product_history_modal.blade.php
Step 3: Include Modal in POS Pages
Edit resources/views/sale_pos/create.blade.php
Find @include('sale_pos.partials.weighing_scale_modal') and add after it:
@include('sale_pos.partials.product_history_modal')
Edit resources/views/sale_pos/edit.blade.php
Add the same include after @include('sale_pos.partials.weighing_scale_modal'):
@include('sale_pos.partials.product_history_modal')
Step 4: Add Controller Method
Edit app/Http/Controllers/SellPosController.php
Add the getProductHistory method before the closing brace of the class.
Copy the content from: SellPosController_getProductHistory.php
Step 5: Add Route
Edit routes/web.php
Find the line:
Route::get('/sells/pos/get-featured-products/{location_id}', [SellPosController::class, 'getFeaturedProducts']);
Add after it:
Route::get('/sells/pos/get-product-history', [SellPosController::class, 'getProductHistory']);
Step 6: Add JavaScript
Edit public/js/pos.js
Add the JavaScript code at the end of the file.
Copy the content from: pos_product_history.js
Step 7: Add Translations
Edit lang/en/lang_v1.php and lang/ar/lang_v1.php
Add the translations before the closing ];
Copy the content from: lang_v1_translations.php
Usage
Go to POS screen
Click the purple history icon button in the header
Enter product SKU or name in the search box
Press Enter or click Search
View history across all tabs (Sales, Purchases, Stock, Warranty, Expiry)
Use pagination controls to navigate through records
Screenshots
Button Location
The button appears in the POS header with a purple history icon.
Modal View
Product info displayed at top (image, name, SKU, current stock)
5 tabs for different history types
Pagination at bottom of each table
Customization
Change Records Per Page
Edit SellPosController.php line with $per_page = 8; to change the number of records per page.
Change Button Color
Edit the button class in header-pos.blade.php:
Current:
tw-text-[#9333EA](purple)Change to any Tailwind color class
Troubleshooting
Modal Not Opening
Check if the modal include is added to both
create.blade.phpandedit.blade.phpClear browser cache and refresh
No Data Showing
Verify the route is added correctly
Check browser console for JavaScript errors
Verify controller method is added
Translations Not Working
Clear Laravel cache:
php artisan cache:clearCheck translation keys match exactly
Recommended Comments